Difference between revisions of "« LAKE CHAUVET » EGLISENEUVE-D’ENTRAIGUES (63) 18.07.1952"
(Created page with "On Friday July 18, 1952, at 6:10 p.m., André Frégnale, geological engineer, walks near Lake Chauvet (Puy-de-Dôme). The weather is very good, the sky is azure blue with a st...") |
|||
| Ligne 5: | Ligne 5: | ||
"It was around 6 p.m., told Mr. Frégnale, when I saw the saucer. Ignoring its circumference, I cannot say at what altitude it was flying. Apparently it was between 3,000 and 8,000 meters. I do not think that the altitude could have been higher, because then, due to the thickness of the atmosphere, the craft would have presented a bluish metallic tint which it did not have.' | "It was around 6 p.m., told Mr. Frégnale, when I saw the saucer. Ignoring its circumference, I cannot say at what altitude it was flying. Apparently it was between 3,000 and 8,000 meters. I do not think that the altitude could have been higher, because then, due to the thickness of the atmosphere, the craft would have presented a bluish metallic tint which it did not have.' | ||
| − | <b>Four | + | <b>Four snapshots.</b> |
"I had time to take four shots very quickly. I saw the craft for about 50 seconds and after taking the views I observed the craft with binoculars. According to my observations and calculations I did later, if the saucer was at 3,000 meters it propelled itself at about 300 meters per second, if it was at 8,000 meters its speed was naturally greater and could reach 800 meters per second. I heard absolutely no noise. | "I had time to take four shots very quickly. I saw the craft for about 50 seconds and after taking the views I observed the craft with binoculars. According to my observations and calculations I did later, if the saucer was at 3,000 meters it propelled itself at about 300 meters per second, if it was at 8,000 meters its speed was naturally greater and could reach 800 meters per second. I heard absolutely no noise. | ||
| Ligne 49: | Ligne 49: | ||
</gallery> | </gallery> | ||
| − | == | + | ==Generalities== |
| − | + | After more than sixty years, it is hard to appraise negatives that have disappeared anyway and worse, to question a witness who is now deceased. Interesting to note, according to the words of the witness, the critical spirit he has with regard to the evaluation of the dimensions, a trap in which many witnesses nevertheless fall today. | |
| − | + | However, the photos taken at Lac Chauvet still appear as intriguing, too good to be true according to some: the question of "what?" always remains posed. | |
| − | + | On the one hand, with hindsight, despite the witness's own distancing, couldn't this be a hoax? Could Frégnal have deliberately photographed a thrown or hovering object? On the other hand, Pierre Guérin, professor at the Institute of Astrophysics in Paris, had published several analyzes of these photos, concluding that they were authentic. However, he started from a premise: the trajectory was straight, basing his analysis on the words of the witness, and therefore his sincerity. | |
| − | + | Doubters and believers have regularly attacked to refute and take a stand. I prefer to warn you immediately: I will not put an end to this matter, I just modestly prefer a contribution. | |
| − | |||
| − | == | + | ==Analysis method== |
| − | + | Without calling into question the words of the witnesses, but without relying on them either, I found the idea of modeling the trajectory in 3D, solely on the basis of the photos, interesting: can we check whether the words of the witnesses do they match the pictures? Especially since browsing the net, I have nowhere found an attempt to reconstruct the scene allowing to represent the framing and the trajectory (except in the form of trigonometric equations and parameters). | |
| − | + | I decided to work "blind", that is to say, without taking up Pierre Guerin's calculation elements, nor those presented on the Adelmon site to try to remain as "neutral" as possible. | |
| − | + | To recreate a three-dimensional model of the scene, I relied on a tool that I use from time to time, which allows me to find the geometry parameters in 3D on objects that we see in photos. Here, I made it evolve a little so that it simultaneously takes into account the 4 photos and offers a dynamic reconstruction of the scene, according to the parameters entered. | |
| − | + | My goal was to find at least one setup that could satisfy the photos and lighting conditions. | |
| + | ===Determination of the orientation of the phenomenon and its contours=== | ||
| − | + | Given the motion blur, to help determine the boundaries of the object in the photo, but also to determine its orientation parameters in space, I assumed it was a disc In 3D. More precisely, a model based on two discs, of which the central one is located very slightly above the other: I took into account a very slight asymmetry of the respective centers. It seems to correspond to a "depression" of the central disc, moreover less than that of a 3D model of clay pigeon (~1% in proportion to the diameter, perhaps considered negligible and requires better photos to decide ). | |
| − | + | I visualized this disk in "flat" space, then I used 3 axes of rotation according to a reference attached to this 3D disk, to vary the display. | |
| − | + | Thanks to this, by playing on the 3 axes of rotation, we vary the position of the 3D shape in space until we find the exact configuration of each photo. | |
| − | + | [[image:3 axes rotation espace, illustration.png|center]] | |
| − | + | These are the rX, rY and rZ values (expressed in degrees) used on the simulator page (presented later in the article) that I saved and that you can modify. I also apply a zoom coefficient (Zoom Factor) which determines the angular size of the PAN on each photo. | |
| − | + | Using the same 3D shape for each photo helps to reduce the uncertainties from one photo to another, such as, for example, on the position of the central dark area, which is sharper in photo 3, which can be as a result, readjust/find more easily on the others. | |
| − | + | ===Determination of the position of the phenomenon in space=== | |
| − | + | The approach was as follows: initially, I only relied on the relative PAN/sun/observer angles so as not to be interfered with by the orientations of the photos. Whatever the position of the photographer and the inclination of his photos, this should not have any impact on the rendering of the phenomenon as such. | |
| − | + | Indeed, there are always at least two markers visible on each photo of the phenomenon which make it possible to delimit a luminous arc along the phenomenon. They are related to the reflection of light on the surface of the object and they are noted in the diagram below by an orange and blue cross. | |
| − | |||
[[image:Chauvet hypotheses.jpg|center|frame|800px| | [[image:Chauvet hypotheses.jpg|center|frame|800px| | ||
| − | • | + | • The orange cross represents the point of extinction of the light rays, in the observer's field of vision. This is the limit beyond which the sun can no longer illuminate. The tangent to the edge of the object at this location indicates the direction of the sun. |
| − | • | + | • The blue cross represents the point of disappearance of the light rays, in the observer's field of vision. Beyond this point the observer can no longer see them because the light rays are well reflected but are behind the object, relative to its position. Using this point of disappearance, and taking the tangent to the edge of the object, we must find the direction of the observer. ]] |
| − | ==Application | + | ==Application of the method== |
| − | + | Starting from this idea, I needed the means to calculate these tangents and therefore to straighten the shapes by choosing the right 3D geometry parameters. Classically, the program I made uses rotations along the 3 axes x, y, z, and considering that the frame formed by the axes (x, y, z) passes through the center of the object. | |
| − | === | + | ===A 3D simulator to find the inclination parameters of the phenomenon=== |
[http://www.u-sphere.com/data/3D/index.php Vers le simulateur] | [http://www.u-sphere.com/data/3D/index.php Vers le simulateur] | ||
| − | + | You can test the program (you won't break anything! default settings are saved, they are automatically reset each time you use it). | |
| − | + | I tried to make it fun enough, and everyone can try to figure out settings that work. | |
| − | |||
==== Comment appliquer les paramètres de prise de vue==== | ==== Comment appliquer les paramètres de prise de vue==== | ||
| − | + | When you connect to the page, here's how it works: | |
| − | # | + | # first, we choose the photo on which we want to work and we press "OK", |
| − | # | + | # then, the green circles must be aligned with the exterior and interior contours of the photos of the phenomenon, with the uncertainty linked to the nature of the bevel on the edge of the object and the blur |
| − | # | + | # then, the yellow cross makes it possible to find the direction of the sun. You must align the yellow diamond on the point of extinction of the light. The yellow arrow then indicates the direction of the sun. The yellow cross (the surface lighting) is attached to the 3D object. The "Z axis rotation" parameter must be varied |
| − | # | + | # finally, the blue cross makes it possible to find the direction of the witness. This time, you have to align the blue diamond, on the second point of extinction of the light, where it disappears to pass behind the phenomenon. You have to play with the "Dir. observer" parameter, independent of the 3D visualization parameters of the object. Note I think that here you can also find the intersection with the point that determines the largest apparent width of the oval: if the photo is horizontal it should be equivalent (see previous diagram). |
| − | + | Finally, you can play with the other parameters: | |
[[image:3D soft legendes.jpg]] | [[image:3D soft legendes.jpg]] | ||
| − | + | And when you are satisfied, you validate again on the [OK] button: a straightened photo is calculated with the given parameters, on this one appears the direction of the sun and the indicator: | |
[[image:Chauvet photo 2b 3D.png]] | [[image:Chauvet photo 2b 3D.png]] | ||
| − | + | These directions make it possible to position the phenomenon on a 2D plane: what matters is that the relative difference between the yellow and blue arrows is preserved. I also considered arbitrarily that the elevation was given by the rotation rX. | |
| − | + | The effective distance to the witness is relative to the size of the phenomenon (in meters), which is also arbitrarily given: you can modify it to simulate an object as large/small as you wish. It will not change the orientation and general geometry. | |
| − | + | Other parameters are accessible: direction of the sun, angular resolution of the photos, angular distance from the center of the phenomena relative to the left edge of each photo. | |
| − | + | The white line below represents an example of a dynamically calculated trajectory. The purple arcs are the angular fields of the photos (straightened horizontally). | |
[[image:Chauvet reconstitution top.png]] | [[image:Chauvet reconstitution top.png]] | ||
| − | + | Note that when you apply the rotation parameters these are done in the following order: | |
| − | + | 1. rotation around the Z axis (in the horizontal plane), | |
| − | + | 2. rotation around the X axis (which corresponds to a lateral inclination, heel or elevation on the horizon) at 90° this is equivalent to seeing the phenomenon at the zenith, and finally, | |
| − | + | 3. Y-axis rotation forward or backward (camber somehow). | |
| − | == | + | ==Findings== |
| − | + | The following conclusions are of course not definitive. However, here is what can be said on the basis of this reconstitution proposal: | |
| − | # | + | # if it is indeed the same series of photos and the same phenomenon, it does indeed have a "relatively" rectilinear trajectory |
| − | # | + | # the altitude is more or less constant: slightly "hollowed" at the start by a steep descent to point 2, then a slight ascent to point 4 |
| − | # | + | # the dark zone is oriented in the axis of the sun, except in photos 3 and 4 an off-centering of about ten degrees occurs, in the direction of movement. |
| − | # | + | # it doesn't take much for photos 3 and 4 to overlap (but we knew that). |
| − | + | I wondered if radiosity could explain the dark zone visible under the phenomenon ( http://fr.wikipedia.org/wiki/Radiosit%C3%A9_%28infographie%29), since this zone is oriented in the axis of the sun. (Particularly on photos 1 and 2, but it is a little less true for 3 and 4). Indeed, perhaps the edge of the phenomenon masked the sun and created a shadow on its inner face? The lighting of the lower face would then have been due only to radiosity (indirect lighting from the ground). I made a 3D model based on a "clay pigeon" type disc, and if we can get close to the desired effect up to a certain point: we need ambient light is much less strong, that it is almost dark: with lighting at 6:10 p.m. local (5:10 p.m. UT), it is much too bright, moreover, in its descending part (1 and 2), the phenomenon is inclined towards the sun; | |
| − | [[image:Chauvet radiosite.png|thumb|center|400px| | + | [[image:Chauvet radiosite.png|thumb|center|400px|3D model of the photographed phenomenon. ]] |
| − | + | Moreover, even with a darker sky, I cannot extend the shadow to the edge of the phenomenon: there is always a clearer outline, contrary to what appears on the image of the film Pathé ( 1921.jpg in PJ). | |
| − | + | So is this dark zone constitutive of the phenomenon? Likely. It also appears degraded: the black seems to be getting lighter towards the back part (see the radiometric cut with IPACO). | |
| − | + | Finally, I was able, by modifying the URL parameters on the Pathé site, to access large format photos normally hidden and extracted from this film. I enclose the two most remarkable: | |
| − | * Celle | + | * Celle or Fregnal (2207) describes his observation in front of the cameras and which makes it possible to see the landscape, in particular a small wooded mountain in the background, looking in the direction of his first photo. At first glance, I will locate it here on the slope: Lat 45.460869, Lon 2.848735, looking south. |
| − | * | + | * The very enlarged one of PAN 3 (1921). The dark area stands out clearly. |
| − | + | If you have a better set of photos than mine, I will add them to the software. Perhaps you also obtained a copy of the film from the Pathé archives? I made the request, if necessary I am a taker. | |
| − | + | Finally, here is a photomontage with the characteristics of the 2D model above: | |
[[image:Chauvet reconstitution photomontage.jpg|800px|thumb|center|La "trajectoire" en rouge est une supposition purement théorique. S'il s'agit d'un canular elle n'a évidemment aucun lieu d'être !]] | [[image:Chauvet reconstitution photomontage.jpg|800px|thumb|center|La "trajectoire" en rouge est une supposition purement théorique. S'il s'agit d'un canular elle n'a évidemment aucun lieu d'être !]] | ||
| − | == | + | ==Outstanding questions== |
| − | * | + | * What is the point visible under the object of which P. Guérin speaks? |
| − | * | + | * The Pathé film should be recovered |
=== Remarque importante === | === Remarque importante === | ||
| − | + | You may have noticed this, but there is a space of possible hypotheses for the 3D reconstruction. The diagram above is only one possible configuration. | |
| − | + | Indeed, a lateral inclination of the phenomenon can be compensated by a modification of its elevation (height above the horizon). Nothing makes it possible to distinguish these two parameters without having a measurement of the elevation on the horizon. However, here, only the last photo allows this calculation to be made directly, knowing that the situation is that of a hilly ridge: the calculation is tricky... Another method would consist of using Pathé's film, which reveals a reconstitution with Frégnale at the foot of the tree. The tree is itself recognizable, there too it would be necessary to use calculations to, with a different shot, find the theoretical elevation. References | |
| − | |||
| − | ↑ Pierre Guérin, | + | ↑ Pierre Guérin, "A Scientific Analysis of Four Photographs of a Flying Disk Near Lac Chauvet", Journal of Scientific Exploration, vol. 8, no. 4, 1994, p. 447-469. |
[[image:Chauvet pathe 1921.jpg|thumb|center|400px|alt=19:21]] [[image:Chauvet pathe 2207.jpg|thumb|center|400px|alt=22:07]] | [[image:Chauvet pathe 1921.jpg|thumb|center|400px|alt=19:21]] [[image:Chauvet pathe 2207.jpg|thumb|center|400px|alt=22:07]] | ||
Version du 19:31, 22 mai 2022
On Friday July 18, 1952, at 6:10 p.m., André Frégnale, geological engineer, walks near Lake Chauvet (Puy-de-Dôme). The weather is very good, the sky is azure blue with a strong westerly wind.
Sommaire
Le témoignage d'André Frégnale
"It was around 6 p.m., told Mr. Frégnale, when I saw the saucer. Ignoring its circumference, I cannot say at what altitude it was flying. Apparently it was between 3,000 and 8,000 meters. I do not think that the altitude could have been higher, because then, due to the thickness of the atmosphere, the craft would have presented a bluish metallic tint which it did not have.'
Four snapshots.
"I had time to take four shots very quickly. I saw the craft for about 50 seconds and after taking the views I observed the craft with binoculars. According to my observations and calculations I did later, if the saucer was at 3,000 meters it propelled itself at about 300 meters per second, if it was at 8,000 meters its speed was naturally greater and could reach 800 meters per second. I heard absolutely no noise.
"The craft - as has often been said - is in the shape of an oval saucer. Below and in the center there seems to be a slight bulge, but I am not sure. Around the part circular appears a brilliant circle. I suppose that above the apparatus of the blades, or some other gyroscopic system, turn very quickly, which would explain the reflection which one sees very clearly on the stereotypes which I took ."
The witness uses a camera that he carries with him, a 24x36 Zeiss Ikonta equipped with a 45 mm lens. He takes 4 shots, for 25 s. (source?)
When the machine is too far to photograph it correctly, the witness takes his binoculars to follow the object which moves away and sees it disappear, almost instantaneously, as if it vanished on the spot. In total, the observation lasted less than 1 min. (source?)
The witness, however, reportedly still refused to believe in the reality of UFOs, and as for the object he photographed, thinks it may be a flying model, or - more surprisingly for a witness direct - of agglomerated cosmic dust (sic).
- Daily Le Méridional, France, p1 and p8
- Pathé Information
(source to be specified)

Photo 1 (a)
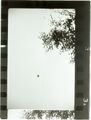
Photo 1 (b)
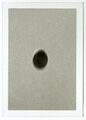
Photo 1 (c)
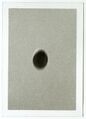
Photo 1 (d)
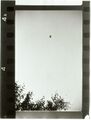
Photo 2 (a)
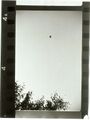
Photo 2 (b)
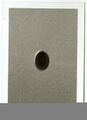
Photo 2 (c)
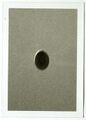
Photo 2 (d)
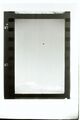
Photo 3 (a)
Photo 3 (b)
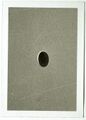
Photo 3 (c)
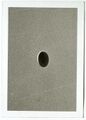
Photo 3 (d)
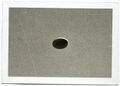
Photo 3 (e)
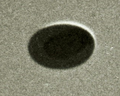
Photo 3 (f)
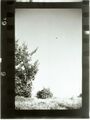
Photo 4 (a)
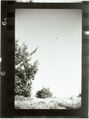
Photo 4 (b)
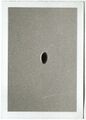
Photo 4 (c)
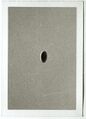
Photo 4 (d)
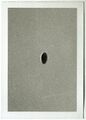
Photo 4 (e)
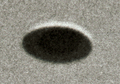
Photo 4 (f)


Generalities
After more than sixty years, it is hard to appraise negatives that have disappeared anyway and worse, to question a witness who is now deceased. Interesting to note, according to the words of the witness, the critical spirit he has with regard to the evaluation of the dimensions, a trap in which many witnesses nevertheless fall today.
However, the photos taken at Lac Chauvet still appear as intriguing, too good to be true according to some: the question of "what?" always remains posed.
On the one hand, with hindsight, despite the witness's own distancing, couldn't this be a hoax? Could Frégnal have deliberately photographed a thrown or hovering object? On the other hand, Pierre Guérin, professor at the Institute of Astrophysics in Paris, had published several analyzes of these photos, concluding that they were authentic. However, he started from a premise: the trajectory was straight, basing his analysis on the words of the witness, and therefore his sincerity.
Doubters and believers have regularly attacked to refute and take a stand. I prefer to warn you immediately: I will not put an end to this matter, I just modestly prefer a contribution.
Analysis method
Without calling into question the words of the witnesses, but without relying on them either, I found the idea of modeling the trajectory in 3D, solely on the basis of the photos, interesting: can we check whether the words of the witnesses do they match the pictures? Especially since browsing the net, I have nowhere found an attempt to reconstruct the scene allowing to represent the framing and the trajectory (except in the form of trigonometric equations and parameters).
I decided to work "blind", that is to say, without taking up Pierre Guerin's calculation elements, nor those presented on the Adelmon site to try to remain as "neutral" as possible.
To recreate a three-dimensional model of the scene, I relied on a tool that I use from time to time, which allows me to find the geometry parameters in 3D on objects that we see in photos. Here, I made it evolve a little so that it simultaneously takes into account the 4 photos and offers a dynamic reconstruction of the scene, according to the parameters entered.
My goal was to find at least one setup that could satisfy the photos and lighting conditions.
Determination of the orientation of the phenomenon and its contours
Given the motion blur, to help determine the boundaries of the object in the photo, but also to determine its orientation parameters in space, I assumed it was a disc In 3D. More precisely, a model based on two discs, of which the central one is located very slightly above the other: I took into account a very slight asymmetry of the respective centers. It seems to correspond to a "depression" of the central disc, moreover less than that of a 3D model of clay pigeon (~1% in proportion to the diameter, perhaps considered negligible and requires better photos to decide ).
I visualized this disk in "flat" space, then I used 3 axes of rotation according to a reference attached to this 3D disk, to vary the display.
Thanks to this, by playing on the 3 axes of rotation, we vary the position of the 3D shape in space until we find the exact configuration of each photo.

These are the rX, rY and rZ values (expressed in degrees) used on the simulator page (presented later in the article) that I saved and that you can modify. I also apply a zoom coefficient (Zoom Factor) which determines the angular size of the PAN on each photo.
Using the same 3D shape for each photo helps to reduce the uncertainties from one photo to another, such as, for example, on the position of the central dark area, which is sharper in photo 3, which can be as a result, readjust/find more easily on the others.
Determination of the position of the phenomenon in space
The approach was as follows: initially, I only relied on the relative PAN/sun/observer angles so as not to be interfered with by the orientations of the photos. Whatever the position of the photographer and the inclination of his photos, this should not have any impact on the rendering of the phenomenon as such.
Indeed, there are always at least two markers visible on each photo of the phenomenon which make it possible to delimit a luminous arc along the phenomenon. They are related to the reflection of light on the surface of the object and they are noted in the diagram below by an orange and blue cross.

Application of the method
Starting from this idea, I needed the means to calculate these tangents and therefore to straighten the shapes by choosing the right 3D geometry parameters. Classically, the program I made uses rotations along the 3 axes x, y, z, and considering that the frame formed by the axes (x, y, z) passes through the center of the object.
A 3D simulator to find the inclination parameters of the phenomenon
You can test the program (you won't break anything! default settings are saved, they are automatically reset each time you use it). I tried to make it fun enough, and everyone can try to figure out settings that work.
Comment appliquer les paramètres de prise de vue
When you connect to the page, here's how it works:
- first, we choose the photo on which we want to work and we press "OK",
- then, the green circles must be aligned with the exterior and interior contours of the photos of the phenomenon, with the uncertainty linked to the nature of the bevel on the edge of the object and the blur
- then, the yellow cross makes it possible to find the direction of the sun. You must align the yellow diamond on the point of extinction of the light. The yellow arrow then indicates the direction of the sun. The yellow cross (the surface lighting) is attached to the 3D object. The "Z axis rotation" parameter must be varied
- finally, the blue cross makes it possible to find the direction of the witness. This time, you have to align the blue diamond, on the second point of extinction of the light, where it disappears to pass behind the phenomenon. You have to play with the "Dir. observer" parameter, independent of the 3D visualization parameters of the object. Note I think that here you can also find the intersection with the point that determines the largest apparent width of the oval: if the photo is horizontal it should be equivalent (see previous diagram).
Finally, you can play with the other parameters:

And when you are satisfied, you validate again on the [OK] button: a straightened photo is calculated with the given parameters, on this one appears the direction of the sun and the indicator:

These directions make it possible to position the phenomenon on a 2D plane: what matters is that the relative difference between the yellow and blue arrows is preserved. I also considered arbitrarily that the elevation was given by the rotation rX.
The effective distance to the witness is relative to the size of the phenomenon (in meters), which is also arbitrarily given: you can modify it to simulate an object as large/small as you wish. It will not change the orientation and general geometry.
Other parameters are accessible: direction of the sun, angular resolution of the photos, angular distance from the center of the phenomena relative to the left edge of each photo.
The white line below represents an example of a dynamically calculated trajectory. The purple arcs are the angular fields of the photos (straightened horizontally).

Note that when you apply the rotation parameters these are done in the following order:
 1. rotation around the Z axis (in the horizontal plane),
 2. rotation around the X axis (which corresponds to a lateral inclination, heel or elevation on the horizon) at 90° this is equivalent to seeing the phenomenon at the zenith, and finally,
 3. Y-axis rotation forward or backward (camber somehow).
Findings
The following conclusions are of course not definitive. However, here is what can be said on the basis of this reconstitution proposal:
- if it is indeed the same series of photos and the same phenomenon, it does indeed have a "relatively" rectilinear trajectory
- the altitude is more or less constant: slightly "hollowed" at the start by a steep descent to point 2, then a slight ascent to point 4
- the dark zone is oriented in the axis of the sun, except in photos 3 and 4 an off-centering of about ten degrees occurs, in the direction of movement.
- it doesn't take much for photos 3 and 4 to overlap (but we knew that).
I wondered if radiosity could explain the dark zone visible under the phenomenon ( http://fr.wikipedia.org/wiki/Radiosit%C3%A9_%28infographie%29), since this zone is oriented in the axis of the sun. (Particularly on photos 1 and 2, but it is a little less true for 3 and 4). Indeed, perhaps the edge of the phenomenon masked the sun and created a shadow on its inner face? The lighting of the lower face would then have been due only to radiosity (indirect lighting from the ground). I made a 3D model based on a "clay pigeon" type disc, and if we can get close to the desired effect up to a certain point: we need ambient light is much less strong, that it is almost dark: with lighting at 6:10 p.m. local (5:10 p.m. UT), it is much too bright, moreover, in its descending part (1 and 2), the phenomenon is inclined towards the sun;

Moreover, even with a darker sky, I cannot extend the shadow to the edge of the phenomenon: there is always a clearer outline, contrary to what appears on the image of the film Pathé ( 1921.jpg in PJ).
So is this dark zone constitutive of the phenomenon? Likely. It also appears degraded: the black seems to be getting lighter towards the back part (see the radiometric cut with IPACO).
Finally, I was able, by modifying the URL parameters on the Pathé site, to access large format photos normally hidden and extracted from this film. I enclose the two most remarkable:
- Celle or Fregnal (2207) describes his observation in front of the cameras and which makes it possible to see the landscape, in particular a small wooded mountain in the background, looking in the direction of his first photo. At first glance, I will locate it here on the slope: Lat 45.460869, Lon 2.848735, looking south.
- The very enlarged one of PAN 3 (1921). The dark area stands out clearly.
If you have a better set of photos than mine, I will add them to the software. Perhaps you also obtained a copy of the film from the Pathé archives? I made the request, if necessary I am a taker.
Finally, here is a photomontage with the characteristics of the 2D model above:

Outstanding questions
- What is the point visible under the object of which P. Guérin speaks?
- The Pathé film should be recovered
Remarque importante
You may have noticed this, but there is a space of possible hypotheses for the 3D reconstruction. The diagram above is only one possible configuration.
Indeed, a lateral inclination of the phenomenon can be compensated by a modification of its elevation (height above the horizon). Nothing makes it possible to distinguish these two parameters without having a measurement of the elevation on the horizon. However, here, only the last photo allows this calculation to be made directly, knowing that the situation is that of a hilly ridge: the calculation is tricky... Another method would consist of using Pathé's film, which reveals a reconstitution with Frégnale at the foot of the tree. The tree is itself recognizable, there too it would be necessary to use calculations to, with a different shot, find the theoretical elevation. References
↑ Pierre Guérin, "A Scientific Analysis of Four Photographs of a Flying Disk Near Lac Chauvet", Journal of Scientific Exploration, vol. 8, no. 4, 1994, p. 447-469.

